Home » Posts tagged 'roof cleaning'
Tag Archives: roof cleaning
The Importance of Roof Cleaning
It’s important to keep your home’s roof clean to prevent damage and extend its life. Roof Cleaning Charleston SC can reduce algae, moss, mildew, mold and dirt build-up that can cause structural damage.
Depending on your roof’s condition, there are different ways to clean it. Costs will vary. Several factors influence the overall price, including: roof size, type of dirt and extent of damage.
Using a low-pressure stream of water combined with specialized cleaning solutions, soft washing techniques are safe for your roof and the surrounding home exterior. This method removes dirt, mildew, fungus, and other organic growths while preserving roofing materials.
Soft washing is a safer alternative to high-pressure washing and is ideal for delicate surfaces like wood siding or shingles. It is also an eco-friendly option, as the cleaning solutions used are biodegradable.
This method begins with a thorough inspection of the exterior surface to identify any areas that require special attention or cleaning, such as cracks, leaks, or stubborn stains. If necessary, these issues should be addressed before the cleaning process begins to prevent further damage and ensure that the cleaning solution is applied evenly.
The roof is then pre-wetted to loosen any built-up debris or dirt before the cleaning solution is applied. A cleaning agent is then allowed to sit for the recommended amount of time, usually 15 – 30 minutes, to break down any accumulated dirt and soil. Afterwards, a low-pressure rinse is performed to remove all chemical residue and contaminants from the roof surface. This step is important as it prevents the potential for any lingering cleaning agents to cause damage to the roof or adjacent structures after it dries.
If you’re planning on doing your own roof cleaning, it’s a good idea to use personal protective equipment, such as gloves, eye protection, and non-slip shoes. It is also advisable to stay hydrated during the cleaning process and take breaks as needed. Additionally, it is recommended to work in well-ventilated areas and avoid direct exposure to the sun.
Alternatively, you can hire professional cleaners who use a mixture of sodium hypochlorite (pool chlorine) and trisodium phosphate (TSP) to remove moss and algae from the roof. This solution is safe for most roofing materials and can be applied using a sprayer or brush. After it dries, the mixture kills spores and inhibits future growth, but it can leave a strong chemical smell. Moreover, it may void any warranties that your roofing materials come with, as these manufacturers require their customers to follow specific maintenance guidelines.
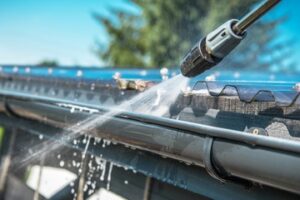
Power Washing
Using a pressure washer with low PSI to clean a roof is one of the most effective and safest ways to remove dirt, grime, mold, mildew, moss, and algae. It’s important to choose a professional who is experienced in this technique, as overly-high pressure can damage shingles and cause leaks. In addition, it’s essential to inspect a roof before beginning the cleaning process to ensure that any cracks or leaks are addressed and repaired.
Before the cleaning begins, a safety harness and lanyard should be worn while working on an elevated surface to prevent falls. Ladders or scaffolding should be secured to a secure anchor point before beginning work. Gloves and eye protection should also be worn to protect against the chemicals and debris used during the cleaning process.
Start by removing any loose debris from the surface of the roof, such as leaves, branches, and dirt piles. Then, apply a roof-safe cleaning solution and allow it to sit for 15-20 minutes. If your roof is covered in stubborn stains, it may be necessary to let the cleaner sit for longer to break down the buildup effectively.
Next, use a soft-bristle brush to gently scrub the roof surface. After scrubbing, rinse the roof with a garden hose at a low PSI to remove the cleaning solution and any loosened dirt, grime, or moss. Rinse from top to bottom to avoid streaking. Finally, inspect the roof to make sure all traces of mold, mildew, and stains have been removed.
Chemical treatments are an alternative method of cleaning a roof that involves spraying the surface with high-strength pool chlorine to kill off algae, fungus, and other organic growths. This method has several disadvantages, however, including the creation of a toxic odor, damage to landscaping and home exteriors, and damage to critical roof components, such as valleys, underlayments, and flashings. Additionally, the high concentrations of chlorine can deteriorate asphalt shingles and lead to premature failure. For these reasons, it’s best to avoid using this cleaning method if possible. Instead, consider other alternatives, such as using a biodegradable roof cleaning solution or zinc strips to reduce the growth of algae and moss.
High-Pressure Washing
Over time, roofs accumulate a variety of unwelcome guests including dirt, grime and organic growths like moss and algae. These organisms not only tarnish the appearance of a roof, they can also cause material degradation and shorten the lifespan of your roofing system. Routine cleaning can eliminate these issues and help keep your home in optimal condition for a long period of time.
Choosing the right method for washing your roof depends on the type of materials used and the state of the roof, such as any signs of damage or wear and tear. In general, soft wash cleaning is the preferred technique, as it uses low pressure and biodegradable chemicals to remove stains and prevent further growth without harming the material.
This is because high-pressure washing can cause shingles, tiles and other types of roofing materials to crack, dislodge or chip. For this reason, it’s best to hire a professional who can safely and effectively clean your roof using the proper techniques.
High-pressure washing uses water at a high rate of 1,300 to 2,800 PSI to blast away built-up dirt and grime. It’s a good option for cleaning hard surfaces, such as concrete, stone and wooden decks. However, it can be too harsh for asphalt shingle roofs and other delicate materials. It’s also important to wear safety equipment when working on a roof, such as a harness and gloves, as well as taking care not to damage nearby landscaping or power lines.
Soft washing uses lower water pressure between 150 and 300 PSI to gently rinse a roof surface with cleaning solutions. This method is more effective than regular washing for removing tough stains and preventing further growth, as it breaks down dirt and grime rather than simply dislodging it.
For soft washing, a biodegradable chemical solution is applied to the surface, which kills off any organic growth and provides a barrier that prevents further build-up. Then, a low-pressure rinse removes the solution and any remaining dirt, leaving the surface of your roof clean.
Chemical Treatment
The roof is one of the most important parts of your house, which helps to protect you from bad weather and other external elements. But due to busy lifestyles, most of the people neglect to clean their roof and leave it with piles of leaves, twigs and all organic debris. This traps rainwater on your roof and causes dampness in your walls. The best way to prevent this from happening is by regularly cleaning your roof.
There are a few different ways of cleaning your roof, but chemical treatment is the preferred method by most expert cleaners. It uses a cleaning solution to kill off any moss and algae build-up, while also preventing future growth. This technique is safe for most roofing materials and is a great alternative to high-pressure washing, which can damage shingles or tiles.
Before starting to use any chemicals on your roof, it’s important to prepare the area. This includes clearing the patio furniture, cars and other items that may be at risk of damage from the cleaning solutions. It’s also essential to wet the surrounding grass and plants, and cover any that would be at risk of direct contact with the cleaning solution with tarps or plastic sheets. This will protect them from the runoff and any overspray that may occur during the cleaning process.
Once the area is prepared, the cleaner can be applied to the roof using a sprayer. It’s important to follow the manufacturer’s instructions for concentration and contact time, as well as rinsing. Finally, a thorough inspection is required to ensure that all traces of the cleaning solution have been rinsed off.
The right cleaning technique for your roof will depend on the type of shingles you have and the severity of any moss or algae build-up. If you have a tile or slate roof, a soft wash or manual scrubbing is usually the best option. However, for a shingle roof, chemical treatment is the most effective way of removing moss and algae while preventing future growth. Always remember to take the weather into account – avoid cleaning your roof during stormy or hot conditions, as this can lead to water-borne debris and further damage.
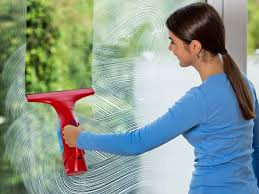
How Professional Window Cleaners Do It
Wash windows with vinegar and water solution or a commercial cleanser. After rinsing, wipe dry with a clean microfiber cloth or newspaper.
Always sweep cobwebs and loose dirt off frames, grids, and hardware before you wet clean them. This helps prevent your cleaner from smearing and dragging dirty dust particles across the surface of the glass. Contact Sea Clear Window Washing & Pressure Cleaning LLC now!
Professionals use various glass cleaning techniques and equipment to ensure the job is done right. They may clean windows with a ladder or use a water-fed pole. Either way, they start at the top of the window and work their way down to ensure all areas are cleaned. They also use a deionized water spray to help with the cleaning process. The deionized water contains no ions, so it won’t pull minerals off the window and cause streaking.
When using a cleaning solution, professionals spray the cleaner on the glass and then wipe it off. The key to a streak-free finish is moderation. If you use too much cleaner, the excess will drip and can leave spots behind. Similarly, skimping on the spray can result in a poor finish.
If you find yourself dealing with stubborn stains, try using a cleaner that has oxalic acid, such as Zuld or Bar Keepers Friend. This can remove mineral deposits that don’t come off with regular cleaning. To apply the cleaner, mix it with water and create a paste. Apply the paste to a soft cloth and rub it over the stain. Then rinse and continue with the cleaning process.
While the glass is being cleaned, it’s important to avoid abrasive scrubbers that could scratch the surface. Professionals use a soft, lint-free cloth or paper towel to wipe away the residue. Once the glass is finished, they inspect it for missed spots and streaks. If they do notice any, they can dampen the cloth with a little more cleaner and re-wipe the spot.
After the squeegee is used to wipe the remaining water off of the glass, professionals dry the windows with a clean microfiber cloth or lint-free paper towel. They begin at the top of the window and work their way down, making sure all areas are completely dry. They may even buff the glass with a soft, dry cloth to give it a polished finish. They also use a lint-free, soft towel to wipe the frame and sill for a streak-free finish.
Windowsills
Whether they’re open or closed, your window sills attract a lot of debris and residue. Moisture, temperature fluctuations, and dead creepy bugs are just a few of the things that collect on them. They can become caked with smudges, dirt, and dust, which detracts from your home’s appearance and can also cause health problems. Window sills should be cleaned weekly or biweekly as part of your regular house cleaning routine to keep them looking clean.
First, dust the windowsills with a microfiber cloth to remove loose and easily removable debris. This will make the rest of the cleaning process easier and more effective. Then, mix a solution of 1/4 cup Pinesol or other all-purpose cleaner with a gallon of water. Spray a microfiber cloth with the solution (avoiding oversaturation) and wipe the sill, including the frame. This will remove the harder, stuck on grime and leave the area much cleaner. Wipe it dry with a different microfiber cloth to finish the job.
If there are stubborn stains on the window sills, you can use a brush to scrub them with soapy water or a mixture of distilled water and white vinegar. A toothbrush is also helpful for hard-to-reach corners and narrow gaps where grime tends to gather. Be sure to dry the sill afterward to prevent warping.
While it’s best to hire a professional to clean the windows, you can do some of the work yourself. For instance, if your windowsills have water marks on them, you can purchase wood cleaner that contains oxalic acid. Follow the manufacturer’s instructions on how to apply it to your windowsills, and it will lift the water marks without damaging the material.
You can also apply a coat of floor wax to your windowsills to protect them from damage and increase their durability. This is especially useful if your windows are prone to water damage. This coating will help the water to run off more quickly, and it will also provide a protective barrier against mold and mildew growth, which can be very difficult to remove once it’s established.
Frames
While clean windows are undoubtedly essential, pristine frames and sills can also elevate the overall look of a home. Using the right tools and cleaning methods, window cleaners are able to clean a wide variety of frame materials without damaging them.
The first step in cleaning window frames is to loosen up any built-up dirt or dust. This can be done with a vacuum cleaner attachment or by hand, depending on the amount of build-up. It is important to pay special attention to corners and crevices, as these areas tend to accumulate more grime.
After the loose dirt is removed, a clean, lint-free towel or microfiber cloth can be used to wipe down the frame. This can be done by hand or with the use of a ladder in hard-to-reach areas. For stubborn stains, a toothbrush may be required to apply a bit more pressure. It is important to avoid scratching the surface of the frame, as this can leave unsightly marks and chips.
If the frame is made of aluminum, it can often become oxidized over time. Oxidation is a result of corrosion that happens when the aluminum comes into contact with air and moisture. It is possible to reverse this process by applying a metal polish and rinsing it with water. This will restore the luster to the aluminum frame and help prevent future damage.
In addition to being a good way to protect the frame from rust, regular polishing can help prevent damage from dirt and dust particles. It is important to remember that the more grit that builds up on a frame, the harder it will be to remove. This is why it is recommended to clean a frame on a regular basis, preferably every three months.
While it is possible to clean a window frame with the right tools and techniques, it is often more convenient and effective to hire a professional. Especially for properties with multiple stories or difficult-to-reach windows, hiring a professional is the best way to ensure that all surfaces are cleaned thoroughly and effectively.
Squeegees
The squeegee is the ultimate tool of professional window cleaners. It eliminates streaks and ensures all soap residue is removed from glass and windowsills. But the squeegee must be used correctly to get the best results. There are many different squeegees available; find one that feels comfortable in your hand and allows you to operate at top speed. Look for a squeegee that is easy to change the rubber channel and one that is made from a material that will not warp or scratch over time.
Before you start cleaning windows with your squeegee, be sure to wipe down all the baseboards and surrounding woodwork, as these are magnets for dirt and grime. Also, be sure to wipe down any window sills and corners of the frame as well. This will make the squeegeeing process much easier and more efficient.
To start, wash the window with a scrubber or microfiber cloth in a reverse “U” pattern (starting at the bottom left corner and going up to the right). This will remove any dirt buildup, cobwebs, or debris. Then rinse off the scrubber or use a bucket of clean water to wash off the rest of the window. Using cool water helps the cleaning solution to dry quickly so it doesn’t leave streaks.
After washing the window, use the squeegee to dry it. This is an essential step to prevent water spots and streaks. When using a squeegee, be sure not to apply too much pressure, as this can cause damage to the window. When applying the squeegee, try to overlap the previous stroke slightly. This will help ensure all areas of the window are completely dry and will give you the best results.
If you’re hiring a professional window cleaning service for your home, be sure that the company is fully insured. This will protect you if a worker is injured on your property while working and will cover medical costs, lost wages, and legal fees in the event of an accident. In addition, you should ask about their experience and whether they are licensed and certified to provide this service.